This is the first part in a multi-part series about how to iPod your wedding or otherwise self-deejay your wedding. Follow our plans as we prepare to have an iPod wedding in November 2011.
A few weeks ago, I discussed how we decided not to have a deejay. I was a little worried that it could be a disaster, but, my fiancé assured me that it would be a pretty straightforward process. The problem is, I’ve never been able to find good, detailed information online about how precisely to iPod your wedding.
Sure, I know that I need speakers, an amplifier, and a mixer. (Wait, what the hell is a mixer?) And I know that we need to create playlists and that we should have twice the amount of music that we anticipate, and all that general stuff. But really, how exactly do you iPod your wedding?
So, follow this series of posts as we learn how to iPod our wedding.
Equipment Essentials
 First up. Equipment. We quickly learned that renting the required deejay equipment was only marginally cheaper than purchasing it. And, since we’re renting our campground venue for several days, we were hoping to get things set up, including deejay equipment, at least two days prior to the wedding. If we rented, the equipment would have to be set up that same day, unless we wanted to pay for a longer rental period. So, we made the easy decision to purchase the equipment. Estimated equipment purchase cost, $350.
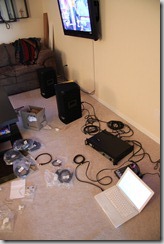
Here is a list of equipment we have purchased to iPod / self-deejay our wedding (including the links to the actual products we bought). The photo on the right is all the equipment currently being tested on our living room floor!
- A mixer
- An Amplifier
- Two Speaker Cabinets, which is what they call large speakers. There are speakers in them, they’re not just a storage cabinet to hold speakers (which is what I thought originally).
- Speaker Accessory Kit (including stands)
- Microphones (3 Pack)
. While we won’t need 3 microphones, the cost of one microphone alone was $22, and $33 for 3 microphones. So, we bought the 3-pack. And now we’ll have a backup microphone too.
Essential Cables for your Equipment
Next up, you’ll need some specialty cables. In nearly all cases, cables are not included with the above mentioned equipment.
All our equipment arrived prior to the cables, so my fiancé tried to set it up using some existing cables he had (for the geeks out there, he was trying to connect it using a cable that was TRS on one end and a TS on the other. Each end should be the same type). At first we thought that our setup wasn’t working, because the speakers did not seem nearly loud enough. But, he quickly realized that it was an issue with the cables. So, he ordered some of the proper cables from Monoprice. (Side note: Monoprice is a great place to buy any cables. HDMI cables, phone chargers, etc. at a great price).
So, this is what we purchased in the way of cables:
- Headphone to RCA Splitter. Although we discovered this 1.5ft cable is a bit short. If you’re planning on using just an iPod, the 1.5 foot cable would be fine. But, if you’re using a laptop, you’ll probably want a longer one so that you have some space allowance to move around the computer to a nearby table or whatever. Here is a 3ft version and a 6ft version.
- Mono Plug to RCA Jack Adaptor (we needed two of these):
- 1/4inch (TRS or Stereo Phono) Male to Male 16AWG Cable (we needed two of these)
- Premier Series XLR Male to XLR Female 16AWG Cable (for the microphone). This is a standard microphone cable. However, the type of cable required may vary depending on the type of microphone you buy. So make sure you check if yours requires a different type of cable. This will depend on the type of microphone that you buy though.
- Premier Series 1/4inch (TRS or Stereo Phono) Male to Male 16AWG Cable. While these are the same types of cables came with the above mentioned speaker kit, we ordered these cables as backups.
- Speakon Cables. These come with the “Speaker Accessory Kit” listed above, but in case you order a different kit that does not include Speakon cables. Although Speakon is a new type of cable, so if you have older speakers, you may need a different type of cable.
- Speaker Wire (as a backup). We’re using speaker wire as a backup to our Speakon cable. We’ll only need this if there is some sort of Speakon-related disaster at the wedding.
- At least one heavy duty extension cord
- At least one power strip
In fact, we ordered extra of all of these things as backups, considering how cheap everything is. In the next post in the series, we’ll explain how to set up and connect all the equipment using the cables.
Watts and what size amplifier do I need?
** My fiancé kindly wrote this section. He did a lot of research to figure out what size amplifier we would need.
Amplifier come in different “sizes” and are rated in watts. You want to get an amplifier that is at least powerful enough to power all your speaker, but not too big because it’ll be more expensive. Although you can damage your equipment by having a amplifier turned up too loud on smaller speakers, it’s actually just as or maybe more dangerous using an under-powered amplifier trying to run speakers that are too big for it, it could cause the equipment to overheat.
If you’re starting from scratch and don’t have any equipment you can first start with the speakers. You need to find out the watts and the impedance of the speakers. Watts tell you how much power the speakers use and the impedance tell you how easy electricity flows thought the speaker. Don’t worry too much about what impedance means technically, just look at the numbers for the product. Impedance is measured in ohms and is representative by the omega sign (Ω). Typically it’ll be either 4 ohms, 8 ohms or 16 ohms.
Looking at the speakers we bought, the listing says 300 watts. Unfortunately, that’s misleading. If you look at the technical details you’ll see that the 300 watts is the “ Peak Power Handling”. The peak power handling isn’t really that useful of a number and what we want to find out is the RMS watts. The RMS watts is the typical watts or the average watts — again it doesn’t really matter what these means technically. So in this case the speakers are 150 watts RMS. The impedance is straightforward and is listed as 8 ohms.
So you might be thinking or cool, 150 watts per speaker, that’s 300 watts total — why the heck do you need a 1400 watt amp? Well just like the speakers the amp manufacturers like to make it sounds more powerful than it really is.
First the 1400 watts is total power, so that 750 watts per channel (i.e. per speaker). Second that’s only if your speakers are 4 ohms. In the case of 8 ohms, like our speakers, it’s only 350 per channel (half of the 4 ohm value). Finally we don’t want a situation where the amp is exactly the same size as the speakers, we want to give a little cushion or headroom. A rule of thumb is to multiply the size of the speakers by 1.6. So in this case it’s 150 x 1.6 which equals 240 watts. So the 350 watts per channel is still plenty big enough. In fact, the 1000 watt version (which works out to 250 watts per channel) would have been fine, but at the time the 1400 watt one was only a few bucks more.
Next Post
Our next post in the series will provide an overview about how to connect the equipment using the cables and we’ll provide a quick overview of how to use the equipment.
If you self-deejay’ed your wedding, is this in line with what you did?


